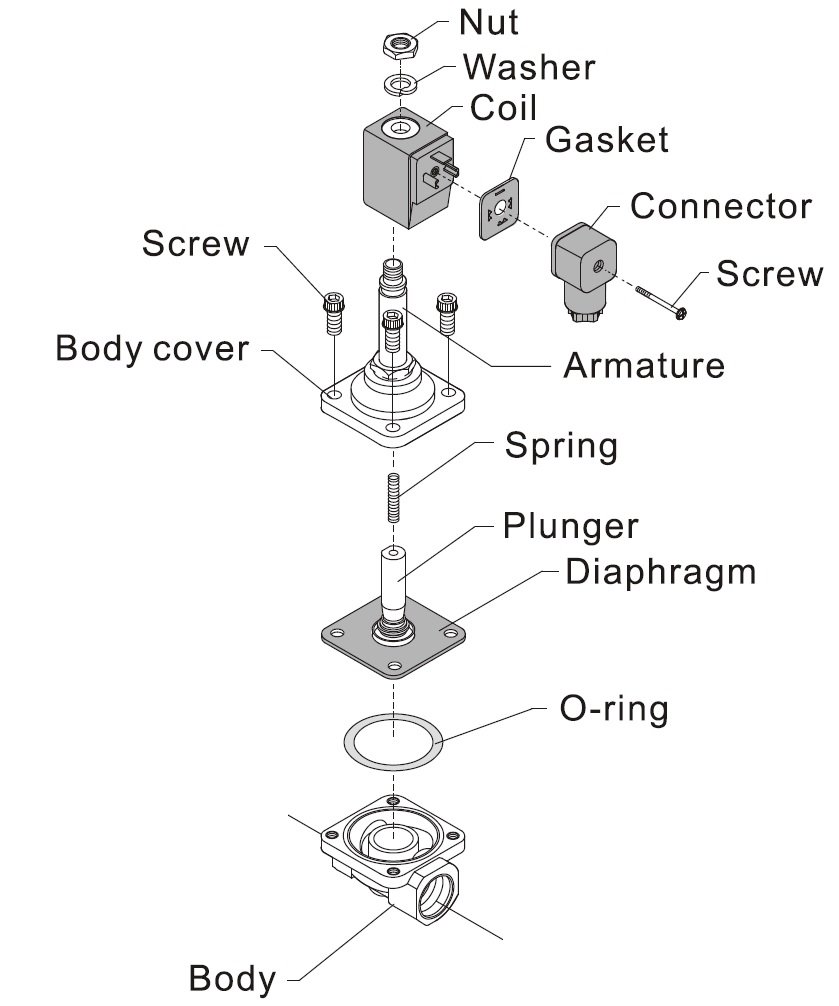
Solenoid Valve Installations and maintenance instructions
| 1. Installation Before mounting the valve, it is necessary to check that the solenoid valve model, the voltage (Volt) and the frequency (Hz) correspond to the characteristics required. |
| 2. Mechanical part a. Assembly of the solenoid valve must correspond with the flow direction indicated with an arrow on the valve body, in some cases this can be indicated by a 1 (input) and a 2 (output). b. If the valves are provided with caps for protecting the connections, make sure that you remove them before assembly. c. Care should be taken to prevent foreign bodies from entering the valve during the assembly phase, e.g. dirt, material chips or particles of insulating material such as PTFE tape from the "external thread" connections. d. Solenoid valves should be installed coil upright, in some circumstances can be used coil horizontal, but any impurities could become blocked inside unable to gravitate down and flush through the tube causing a malfunction. Mounting the solenoid coil downwards is not recommended. e. When installing the valve, make sure that the position and surrounding space are sufficient to allow for possible future maintenance or replacement of the coil. f. Never use part of the tube or coil itself as a lever during the tightening phase: this could cause irreparable damage to the valve. g. In those installations where impurities, slag or deposits of various types may infiltrate the fluid, it is advisable to mount a filter upstream of the valve. h. In case of solenoid valves with holes drilled for supports, use must be made exclusively of these without modifying the holes or anything else on the valve body in order for the valve to run correctly. i. For solenoid valves with connections to be welded, please refer to paragraph 4. |
| 3. Electrical Connections a. Before connecting the coil to the supply system, make sure that the characteristics conform to the supply voltage. b. Where applicable, the earth terminal has to be connected. c. The coil must not be energised before being installed onto the valve, since this will cause it to burn out. d. Rotate the coil to the most suitable position, loosening and subsequently tightening the upper nut. |
| 4. Working Temperature a, It is normal for the coil temperature to increase during operation; irregular overheating will cause smoke and smell of burning. in this case the power supply must be immediately isolated. b. Care should be taken not to install the valve near a source of heat or in environments where there could be a disruption to the dissipation of heat produced by the coil. c. For special conditions, e.g. high temperatures or particular safety regulation, please consult our catalogue or our technical office. d. Particular attention should be paid to the temperatures when installing valves with welded connections. e. When carrying out welding between the valve connection and the pipe system, it is necessary to dismantle the coil and check that the temperature of the valve body does not exceed values of 100 C- 150 C (200 F -300 F). The flame should be regulated so that it does not come into contact with the valve. it is advisable to cool the valve body by warping it in a wet cloth. Should it be impossible to carry out their precautions, we suggested dismantling the parts inside the valve. |
| 5. Maintenance a. After disconnecting the supply voltage and discharging the pressure, carry out inspection of the valve. b. Clean and inspect all the internal parts and replace them if necessary with type original spare parts available, as indicated in the catalogue. c. Remount all the parts, making up the solenoid valve with care, paying great attention to the correct position of each part and protecting the stealing surfaces. d. Check for tightness and correct operation. These general instructions that give an approximate guide for the correct use of a solenoid valve, but cannot in any way be considered as a substitute for the original manufacturer's instructions that would give specific characteristics for the valve in question. ATEX - Do not touch any valve that is or could be in an ATEX hazardous area where there could be potentially explosive or flammable liquids, gases or dusts. Consult an ATEX qualified engineer before commencing any electrical work whatsoever. |

You can download a PDF copy of our general Solenoid Valve IOM Manual
